<div style='background-color: none transparent;'></div>

backlinks check Google

Bài đăng phổ biến

Blogger tricks

Hacking BLog

Showing posts with label Computer Fixes. Show all posts

How to Shutdown a remote computer

Monday, April 1, 2013

A guide on how to shutdown a remote computer

In today's tips and tricks section of the computer fixes,i am going to share with you a small guide on how you can shutdown a remote computer.In some cases you might find yourself in a situation where you aren't able to physically access the system,in those cases this fix comes in very handy.

Step by Step Guide

  • Click on the Start Menu(Windows icon on the bottom left corner of your screen)
  • Select Run and type in the command Shutdown -i (Incase you are using an operating system before windows 7.Incase you are using Windows 7 follow the next step and ignore this one
  • Type in Shutdown -i in the search box which has search programs and files written on it.
  • The following screen will then be displayed

 
  • Click on add and type in the system name and click OK.
  • Below 'What do you want these computers to do' select an option of your choice.
  • Rest of the options are self explanatory,which you can choose as per your liking.
  • Once you reach the comment section make sure you type in something or else the OK button will remain greyed out.
  • Now click on OK
  • You will now see the system you have selected being switched off or restarted depending on the choice you made.

Please bear in mind in most cases this will work on a remote system which is a part of the same network.

Hope this during will help you shutdown a remote computer.

Continue Reading | comments

How to fix unclickable profile picture in Facebook

Thursday, March 28, 2013

How to fix unclickable Facebook profile picture problem

The other day i had a problem with my Facebook (Social Networking Website) as i was unable to click on my main display photo despite changing the privacy settings to public.The actual problem was,when i clicked on it rather than the photo opening in a different screen nothing happened.Through this guide today i will reveal to you  a simple fix to sort out the unclickable Facebook profile picture problem.
facebook

Steps to fix the unclickable problem

Before you read through the steps make sure that the privacy settings of your main display photo is either public or friends and not 'Only Me'.
  • Go to your profile picture Album.
  • Browse until you find the existing photo which is unclickable.
  • Once you find it hover the mouse pointer somewhere within the photo.
  • The above step will bring up additional options such as tag photos,options,share and like at the bottom.
  • Click on options
  • Click on Make Profile Picture (Again)
That's about it.This will fix the problem where your friends or you yourself were unable to open up your photo.From what i have seen with my friends or colleagues page on this social networking site,this might just be a minor bug within a system.I actually don't mind the bug as the fix was simple enough and did not make me tear my hair out.

Hope this guide of how to fix unclickable profile picture will help you out.
Continue Reading | comments

How to rename multiple files in windows

Tuesday, March 26, 2013

Rename Multiple files in windows

In today's tips and tricks section i am going to share with you a guide on how you can quickly rename multiple files within Microsoft Windows Operating system.Sometimes you might need to change name of the files within a folder to a same file name but with different numbers towards the end.This guide will let you know what you exactly need to do to achieve the same.Until finding out about this fix i was using an application called as Bulk Renamer,Which performs the same functions as i have explained in the guide below.

If you need more than one file renamed,the first thing you need to do is highlight the ones you are looking to change the name for by left clicking on the mouse and dragging it across the ones you are looking to target or by pressing CTRL+A on the keyboard if you are looking to to target all the contents within a  particular folder.

Rename Multiple Files
Once they are highlighted press the F2 key on your Keyboard.

A cursor will appear on the name of the first file highlighted.Enter a file name of your choice.

Once you press enter the subsequent file names will have the same name but with numbers such as (1) (2) (3) towards the end.

Hope this guide helps you rename multiple files within the windows operating system.
Continue Reading | comments

How to setup System restore on Windows 7

Sunday, March 24, 2013

System Restore on Windows 7

In today's tips and tricks section i am going to share with you a few tips on how you can enable or disable system restore on windows 7.There are times when you use your computer and for some reason a software stops working,your computer keeps rebooting or you get various errors for no apparent reason.This is the time when you need to revert the changes you have made to take your computer back in time when it was performing without any problems or errors.

A guide on how to setup a restore point on windows 7

Now you must be wondering how can you possibly setup a restore point to be able to revert the operating system to a state where all was working well.Its pretty simple just follow the steps below.
Windows 7
  • Click on Start (A windows icon on the bottom left of your screen on taskbar)-->Right click on computer and select properties-->Click on System protection on the left hand side of your screen and a  properties screen will open up which will show an option of 'create' at the bottom.
  • Click on create and name the restore point to a one of your choice.
You have now setup a restore point to which you can come back to based on any problems you might face in the future.

How to use restore function to go back in time?

  • Click on Start-->All Programs-->Accessories-->System Tools--->System restore
  • A new screen will open up which will ask you which point you would like to go back to (Automatically created one or the one that you manually created)
  • Click on the option based on your preference and click next and let windows 7 do its job.
  • It might take 5-10 minutes to complete and once done your computer will be reverted back to a point you have selected.
Note:Any programs,softwares or applications you might have installed after the restore point you selected might not be available after the process of restoration has completed.

How to disable this feature?

For any reason if you would like to disable this feature on windows 7.Do the following
  • Click on Start (A windows icon on the bottom left of your screen on taskbar)-->Right click on computer and select properties-->Click on System protection on the left hand side of your screen and a system properties screen will open up.
  • Click on  configure and then select turn off system protection.
Make sure to setup a point where you can revert to in case something fails at least once a week.In normal cases a point is automatically setup but if you really need to be specific,Its always a better option to go the manual way.

Hope this guide will help you setup or disable system restore on windows 7.
Continue Reading | comments

How to change default operating system during windows 7 startup

Friday, March 22, 2013

Change Default operating system highlighted during windows 7 start screen

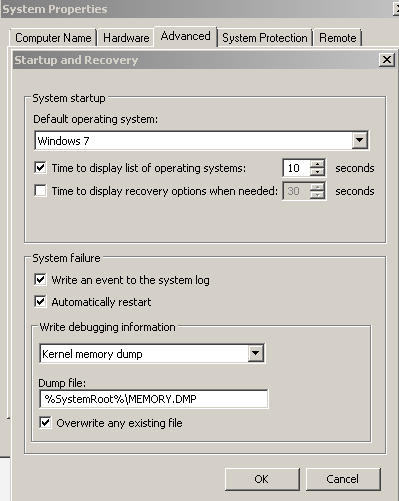
When you have more than one OS installed on your computer,You might want to change the one that is highlighted as a default when the windows 7 loads up.In today's Tips and tricks section i am going to share with you a small tutorial on how you can change the default operating system (That is already installed on your hard disk separately and displays on the startup screen) to a one of your choice.

To make the change first go into startup and recovery screen by following the path below

Start-->Right click on computer-->Properties-->click on Advanced System Settings on the left hand side-->click on settings below startup and recovery

Once you follow the path above you will see a screen as shown in the screenshot below

startup and recovery

All you have to do once you are in the above screen is click on the dropdown below default operating system and select the one of your choice that you would like to be highlighted when your computer loads up and click on OK and click on apply on the screen below it.You can also choose loads of other features from this screen such as the time of display and based on your requirements you can select the amount of seconds you would like to wait before your computer loads up.

Hope this guide helps you to change your default operating system to the one of your choice.It is always advisable to check the other OS before you choose from the list of options just to make sure it loads up fine.
Continue Reading | comments

How to uninstall programs on windows 7

Wednesday, March 20, 2013

Tips on How to uninstall programs on Windows 7 Operating system

Today in the tips and tricks section for computer fixes i will share with you a few tips on how to uninstall programs on windows 7 operating system.The tutorial is a very simple one,So don't worry i am sure you will find it easy to follow.Below are the steps you can follow if you would like to clear up space by uninstalling an application that you might not need or which might be unnecessary.

How to uninstall programs on Windows 7?

Windows 7
You can uninstall programs on windows 7 by going to your control panel screen by following the path below.

Start (Windows Symbol on the bottom left corner) -->Control Panel and below programs click uninstall a program.This will highlight a list of programs that are installed on your computer.All you need to do at this point is highlight the program that you need to remove and click on uninstall on the top of your screen or right click on it and select uninstall.

Tip:You can also access control panel from your desktop (If Enabled) or by going to computer and clicking on open control panel option which you will be able to see at the top your screen

One you have clicked uninstall just keep clicking next and in the end click on finish when the program has been uninstalled.

Note:Make sure you don't remove an application you feel might be related with another application such as adobe flash player,Facebook messenger etc.If you feel you have installed a program earlier which now needs uninstalling only then move forward,Bear in mind that if you remove a program which you are unsure about it might end up making the program that actually needs that particular application to run fail.

In case if you see that your getting an error during the uninstallation,You can download a free application such as Revo Uninstaller through which you can force the program or the application to uninstall itself by right clicking the application within the revo uninstaller and selecting force uninstall.

Hope this guide of how to uninstall programs on windows 7 will help you overcome any confusions you might have.
Continue Reading | comments

How to Speed up Windows 7 to enhance performance

Monday, March 18, 2013

A guide on How to Speed up Windows 7

A common problem any PC/Laptop owners have is the computer taking ages to load.It tends get even more frustrating especially when you are in between something and the system fails to respond.Makes you tear you hair doesn't it?
Windows 7

Keeping that in mind in today i will share with you a few tips and tricks which will help you speed up windows 7 and make your life a lot easier.

The first thing to keep in mind while you speed up windows 7 is getting your priorities right.Unless you have an alienware or a computer which has hardware specification which is really high you will not be able to get everything at once.You will need to either sacrifice on the performance or the look.Like everyone else i hate the basic look of windows but the performance it gives me is at least three times better than aero and other features enabled.lets get into a bit more details on speeding up your windows 7

Get the Windows 7 Basic Look

To get the basic look go to Start Menu-->Control Panel-->System and security-->System-->Advanced System Settings (on the left hand side)-->Advanced -->Below Performance-->Settings-->Visual Effects and click on Adjust for best performance or right click on computer icon within the start menu or desktop -->Properties-->Advanced system settings (on he left hand side) -->Advanced-->Below Performance settings-->Visual effects and click on Adjust for best performance

Once you have selected the best performance click on Apply and then OK.The look of your windows will now be Basic and will not feature aero and other graphics that eat up your RAM.This will definitely help you speed up Windows 7

If you are looking to move a step further to make sure that your PC or a laptop is optimized to a maximum level the you can increase the size of the virtual RAM.

Increasing Size of Virtual RAM

You can try experimenting by changing the size of the Virtual RAM as well.To increase the size of the virtual RAM  go to the same screen as i said earlier but instead of Visual effects tab you need to select Advanced.Once you reach the screen you then need to the remove tick near Automatically manage paging file size for all drive which will make the area editable.

Once you are on the edit screen you can put a bullet next to custom size and set an initial and maximum size.A point to note here is to make sure you check how much space you have on your hard disk and don't allocate all the free space as a virtual Ram.Try to allocate 5-10 percent of it and gradually increase it keeping in mind how much hard disk space you are willing to sacrifice.

Third Party Software to Speed up Windows 7

One of the best applications i have been using over the years to clear temporary files and cache is CCleaner which is very easy to use and really works wonders to improve your system's optimization by clearing Cookies,Temporary files and Stale registry files.

If none of the above steps to speed up windows 7 work for you then the problem might be with your hardware as in most cases this should at least help in enhancing your system's performance by 75%.
Continue Reading | comments
 
Copyright © 2011. adwords keyword tool . All Rights Reserved
Company Info | Contact Us | Privacy policy | Term of use | Widget | Advertise with Us | Site map
Template Modify by Creating Website. Inpire by Darkmatter Rockettheme Proudly powered by Blogger